Monday, October 31, 2011

Happy Halloween and Happy Birthday Dear Daughter Cora!

Cora's white kitty costume upcycled from two cashmere sweaters. Little Juniper's Totoro costume was originally made for Cora's first birthday, and the fabric used for the white part of the belly was upcycled from a thrift store found bathrobe. May add more to this post, but it's been an extended three evenings of Halloween activity and birthdays, and I am pooped.

Wednesday, June 22, 2011

Tags...

For some time now, years I guess, I have wanted labels to put in the things I create. So that one day, when my daughters are digging through the boxes of old textiles I saved for them to pass on to their children, that they will know which ones were lovingly hand stitched by me. I think it also adds a personal touch when giving a handmade item as a gift...sort of like a signature on a painting.

Today I finished a group of tags I had in the works a while back...as far back as May 2010 that is...and then our printer died.

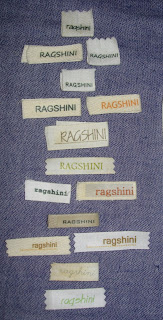
Originally I had all these pieces of cut up photo transfer paper organized in little plastic ziplocs and was just going to iron a label as I needed it, some I thought would just be ironed directly to the garment rather than on a tag. These started out in a grid like form on an 8 by 10 sheet of paper and then I printed them on photo transfer paper. I think I used an address label template on a word program and then printed in each block what I wanted...each one different. I like to experiment. I cut close to the words and that seems to keep the labels softer, rather than stiff. According to the directions the tranfer will soften with washings also.

These are the finished tags. Some are loop style, and others will be sewn on like a flat piece. Since it has been a while since I looked at these, some of the name ideas seem silly and not at all me. But that is what experimenting is for...and maybe a few years from now, my tags will evolve and be different. For now, this is what I could do with a printer, transfer paper, my grandpas old chrome sunbeam iron, and some twill tape.

I am mostly leaning towards the ones with 'Ragshini', pronounced rag-shee-nee. It's pretty simple and has a simple personal story behind it. For those who know me, I am open to suggestions for new names. I tried coming up with something redhead in the name, but nothing is hitting me like a brick so far.

I had the idea of using a continuous length of twill tape, and wished I'd have thought of it sooner in my pressings. It could work well to store them on the twill tape this way and wrapped around an old wooden spool, especially if the labels were consistent in their design, which eventually I should do for simplicities sake, and when I decide what I like the looks of best.

It was fun to see the final product of these labels with my daughters name. Next time I might do her full name including last, as I always find it remarkable to find a piece of history like an old crazy quilt, with a full name written in ink somewhere on the fabric.

Posted by Picasa

Saturday, June 18, 2011

Birthday Bag!

Cora's friend Ella turned six recently, and for her birthday, I made her a little bag. I am not good at thinking of what a kid might want, and like even less going to look in a big box store for toys. I thought a multi purpose bag would be the answer. It could carry art supplies, toys, a picnic lunch, or be used as a beach bag, and it won't ever be mistaken for someone other than ella's, since it is 'one of a kind'. This was a really fun project to make. I loved the challenge of making the letters, and Cora helped by picking out colors for the straps from my 'worms' pile.


Posted by Picasa

Tuesday, May 24, 2011

Technical Difficulties....

Having some technical difficulties with my photo program, blogger, and e-mail, hope to be back shortly....

Tuesday, May 10, 2011

Caught Up In The Details...

It has been exactly a month since i posted on this sweater. The reason I haven't finished it, is because I got caught up in the details. It hasn't taken me all this time to stitch every little pussy willow bud, but since i always have a number of projects in my work basket, I just work on them in bits as I find a few minutes here and there. When I dreamed up this sweater...it was going to be entirely different. I had a silk tie picked out that I was going to use to trim the sweater, and it was going to be a cardigan with vintage buttons. After playing around with it for a while though, it took an entirely different path.

Baby sweater in progress...


I wasn't sure how I should attach the pussy willow flowers, so I experimented with a couple different variations. The bottom one looks like an albino coffee bean, and the second one up is fine , but in the end I decided to do a stitch that wouldn't show. The top three are stitched on using a hidden stitch, which I just made up as I went, but I think there is really a stitch called that. I used Nymo beading thread, and ran it through beeswax each time I applied a new flower, however I think regular thread would have been adequate.


Posted by Picasa

Saturday, May 7, 2011

'Out and About'-Spring Shorts From Pants

My daughter recently had the opportunity to spend time with her good friend Connor for a playdate. When we arrived at their house, Connor came running down the stairs in the most perfect pair of kids shorts...at least in my book. What started out as a pair of cargo pants that had endured a long hard winter and school year....turned into these fun shorts with the help of some cropping and hemming restoration by his mom Heidi. Connor then created his masterpiece using Crayola Fabric Markers.


Cora's friend Connor modeling his awesome one-of-a-kind-shorts!


What a great alternative canvas for kids!

Fun details on the reinforcements of the pockets.

Posted by Picasa
Spring is the time of year to reevaluate last years spring wardrobe and clothes worn from the past school year, for the potential to upcycle them into a garment that will last through another season. These shorts are a fantastic project for kids, and a great way to teach them about upcycling and reviving something worn. Thanks to Heidi and Connor for the inspiration. All Photos by Heidi Eyestone.

Tuesday, May 3, 2011

Upcycled Onsie into a New Dress


The other day as our family was getting dressed and ready to head out for the day, I realized that both my daughter and I were wearing the bottom half of a cashmere sweater, but upcycled in different ways. Pictured here is me wearing a cowl that is the bottom half of a cashmere sweater, and the skirt part of my daughters dress is also the bottom half of a cashmere sweater.


I just finished the dress, hat, and bottoms last week...still have to finish the booties...

Notes on the Dress: This was a really fun project to tackle, but also sat on the back burner for a while after I had started it, due to running into questions regarding the stretchability of the waistline once the basting stitch was in, and uncertainty in what stitch to use with the gathers so that the skirt and onsie together could stretch. I never did figure that out, and near as i could figure, i would have to pull out the basting stitch carefully after sewing the gathered skirt to the onsie if i wanted the whole works to stretch. also my gathers slide back and forth slightly. why is this? Is it because I am using a loose knit fabric? Perhaps a second time around, I'll experiment a little more and see what i can figure out. It turns out that my onsie was wide enough to not have to be concerned about the skirt having any stretch to it.

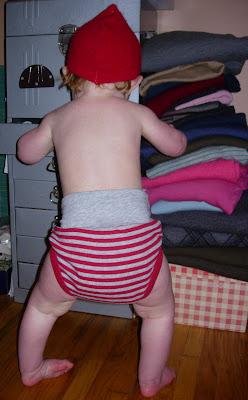
Notes on the bottoms: Originally I cut the bottom of the onsie with enough extra on top with what i thought would be adequate to just add elastic to the waistband, but i decided to attach a wide waistband for the comfort factor. I cut fabric from a t-shirt to make the waistband.

Notes on the hat: The hat was made utilizing the short sleeves of the cashmere sweater if i remember right, so i didn't have to hem the edge of the hat. In the photo she is wearing the hat so that the seam is down the midde of her forhead which makes it look like a peter pan pixie hat. It was made intending for the seams to go on the sides.

For the dress project, the sweater was not felted, but after cutting it up, I lightly felted some of the smaller remnants for the hat, and booties. For the cowl, the sweater was also lightly felted.


Photo story below, and showing the bottom half of the onsie.

Discovering mama's sewing drawers for the first time.

ooooh, what are all these colorful things inside?


Beginning to empty the thread drawer. (notice large stash of merino sweaters for upcycling on the side of cabinet)


I have been challenged with picking a name for this post. Here is the list i have come up with:
Upcycled Onsie Dress
Two Rectangles(this one's a little more abstract)
Extend the Life of an Old/Outgrown Onsie
Juniper's New Dress
Transform an Old Onsie into a New Dress
New Life for an Old Onsie